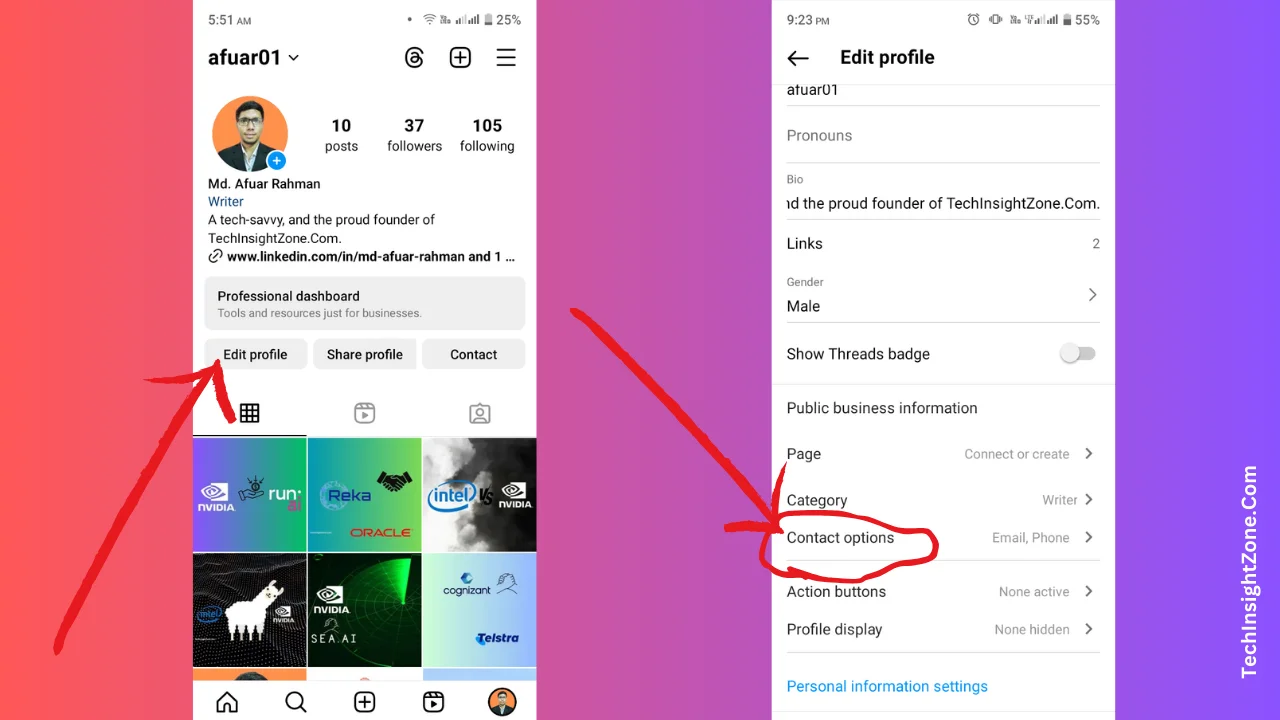
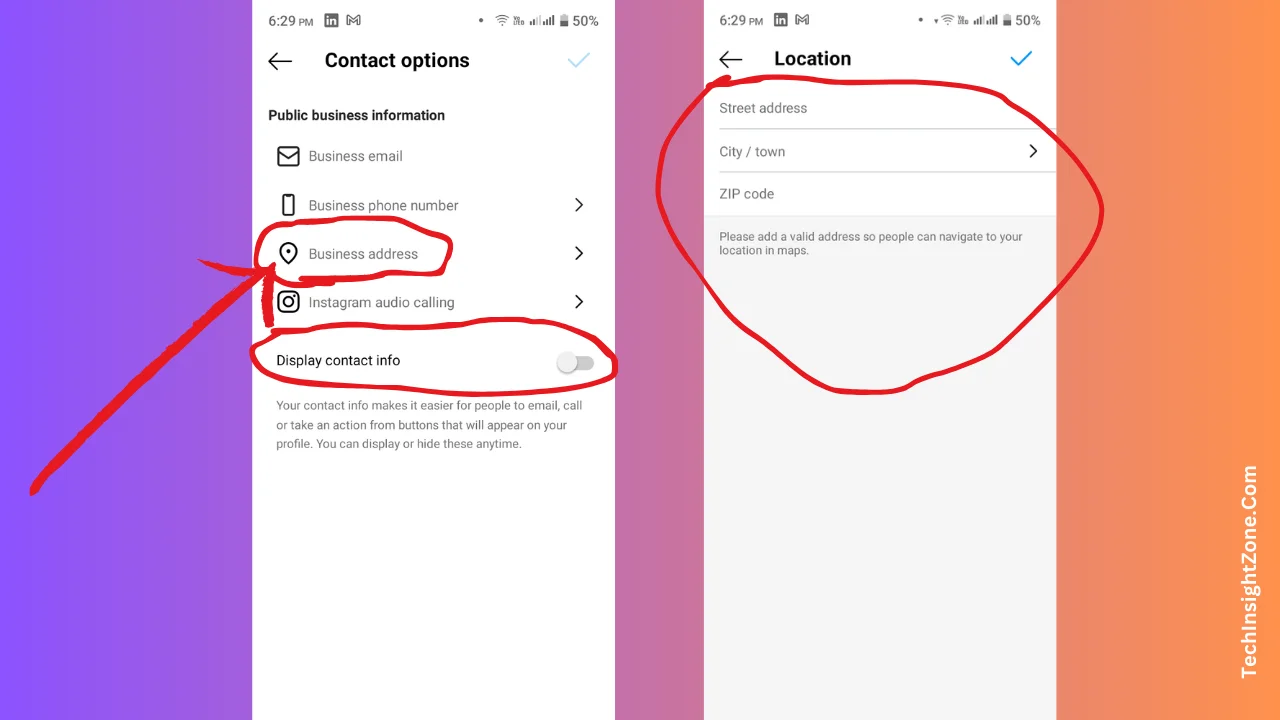
To change your country on Instagram, you have to change your account type to “Professional Account”. After that, go to your profile, click on the “Edit Profile” button, and find your “Contact Options” settings. From there, you will get the option to change your business address.
But here’s the thing—this feature is only available for professional accounts (Business or Creator). So, if you’re still using a personal account, you’ll need to switch first before you can change your location.
If you’re in a hurry and just want a quick step-by-step guide, watch this video now:
But if you want a detailed breakdown and want to start from the steps to switching to a professional account, keep reading—I’ve got you covered! 👇
How to Change Your Region/Country on Instagram?
Step 1: Log in and Switch to a Business Account If Necessary
If your Instagram account type is “Personal,” then it’s a prerequisite to switch to a business account to change your location.
To switch to a business account, follow these simple steps:
1. Open the Instagram app on your phone and go to your profile.
2. Once on your profile, tap the three horizontal lines in the top right corner to access the “Settings and Activity” menu.
3. From the “Settings and Activity” menu, scroll down and select “Account Type and Tools” under the “For Professionals” category.
4. Inside the Account Type and Tools settings, tap on “Switch to Professional Account.”
5. Follow the on-screen prompts to select the appropriate category for your account (e.g., Writer, Gamer).
6. After that, select the “Business” category option to enable location and country changes when prompted.
7. Now, simply keep clicking the next button to complete the remaining steps in the setup process, and skip those that are not relevant to your goals.
Congratulations! You’ve successfully switched to a business account, which unlocks the ability to customize your location settings.
Step 2: Change Your Country/Location from the Business Account Settings
Now that you’ve switched to a business account, it’s time to ensure that your profile is properly set up to reflect your desired location or country. Follow these steps to configure your account:
1. Navigate to Edit Profile: Navigate to your profile again and tap the “Edit Profile” button located next to your username.
2. Find Contact Options: Scroll down until you find “Contact Options” under the “Public Business Information” section.
3. Access the Address Field: Tap on the “Business Address” field to enter your location details, including street name, city, and zip code.
5. Input Location Information: Carefully enter the information for your desired location or country, ensuring accuracy to avoid any issues.
6. Confirm Changes: Once you’ve entered the necessary information, tap “Done” or the “tick mark” option from the top right corner to save your changes.
7. Enabling Display of Contact Information: After changing your country, don’t forget to return to “Contact Options” and turn on the “Display Contact Info” toggle to show your updated location on your profile.
Finally, click the “tick mark” on the “Contact Options” page to save your location changes (watch the video above to see the steps in action).
Just remember to add your valid address so that your audience can find it on maps!
Well, this is how easy it is to change your location/country on Instagram. And once you’ve mastered that, why not explore tweaking your suggested Reels too? Discover how to refine your Reels feed to match your interests seamlessly.
Dive into these easy steps for a more personalized Instagram journey.
Final Words:
Changing your Instagram region or country might seem complex at first, but this guide has broken it down into simple steps. By following this process and switching to a professional account (if needed), you can unlock the ability to tailor your profile’s location to your privacy preferences or business strategies.
We hope this straightforward tutorial has helped guide you through the process of changing your location on Instagram. Remember to keep your account information up to date and explore the various customization options available to business accounts to maximize your Instagram presence.
Thank you for joining us on this journey to Instagram mastery. Stay tuned to Tech Insight Zone’s Instagram Guides for more tips and insights, and make the most of your Instagram experience!


