

Verifying your LinkedIn profile can help you build trust with potential connections and help you stand out in the professional world.
So, if you’re thinking about getting verified, yes, it’s worth spending a few minutes on the verification process.
LinkedIn offers three ways to verify your profile; you can choose any of them:
- Identity Verification: Using a government-issued ID or NFC-enabled passport (depending on your location).
- Workplace Verification: Using your work email, Microsoft Entra Verified ID, or a LinkedIn license (Learning or Recruiter).
- Educational Institution Verification: Using a LinkedIn Learning license.
I personally like the Identity Verification method, so in this guide, I will show you how to verify your identity so that you can boost your visibility and unlock the full potential of LinkedIn networking.
Don’t worry, I will also discuss the two other options in case you do not have an NFC-enabled passport or a supported ID.
3 Steps to Verify Your LinkedIn Profile via Identity Verification

Step 1. What Will You Need to Verify Your Identity:
To verify your identity on LinkedIn, you’ll need specific documents depending on your location and your smartphone. LinkedIn partners with two services: CLEAR (for users in the USA, Canada, and Mexico) and Persona (for users in most other countries).
Here’s a breakdown:
- CLEAR (USA, Canada, Mexico): You’ll need a valid, unexpired government-issued ID (such as a driver’s license, passport, or state ID) and a personal phone number (not a business number) registered in one of these countries.
- Persona (Most Other Countries): The primary requirement is a valid, NFC-enabled passport or e-passport. Some countries also accept other forms of government-issued identification, such as national ID cards or residence permits. See LinkedIn’s help page for specific country requirements.
- LinkedIn Moblie App: The Identity verification process requires scanning the NFC chip and taking a selfie, so you will need the LinkedIn mobile app installed on your Android or IOS device.
Once you are ready with the documents and your LinkedIn mobile app, let’s move forward.
(We will show you the process for Persona; however, the procedure is nearly identical for CLEAR.)
Step 2. Getting Started
To begin the identity verification process on LinkedIn:
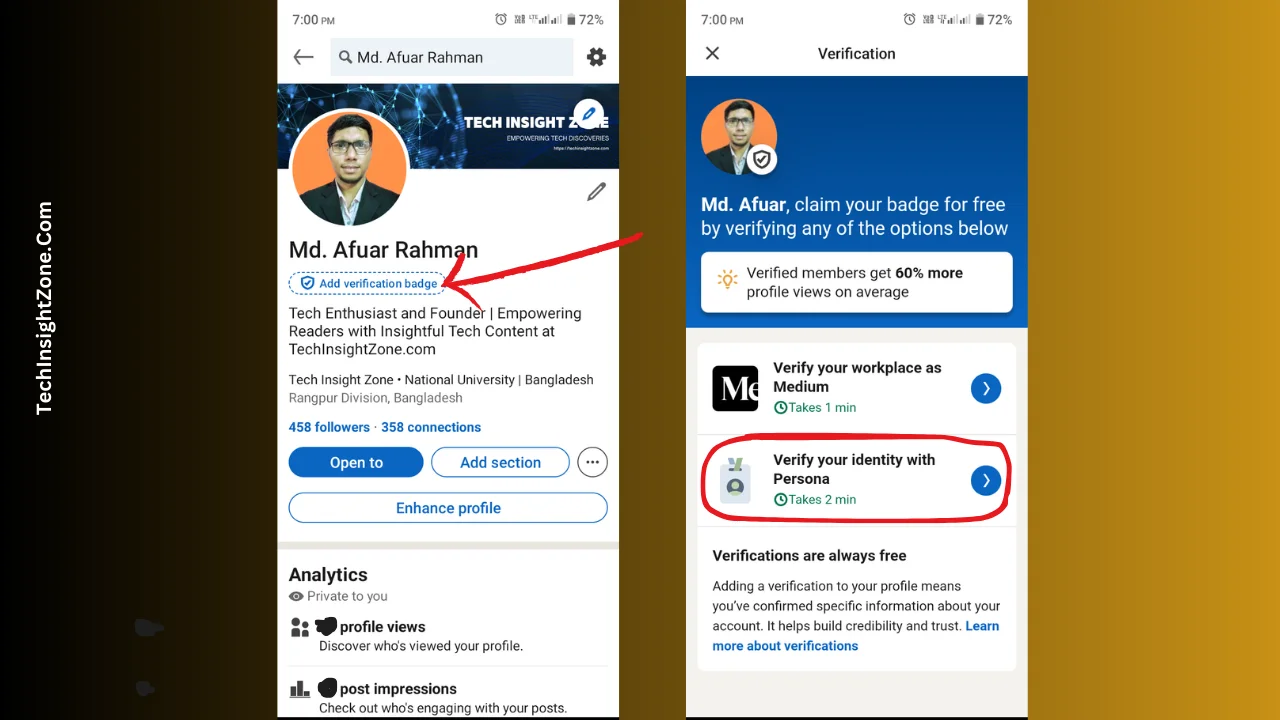
- Log in and go to your LinkedIn profile.
- If you are not verified yet, you will see an “Add Verification Badge” button right under your profile name (visible on both desktop and mobile apps).
- Now, click on the “Add Verification Badge” button.
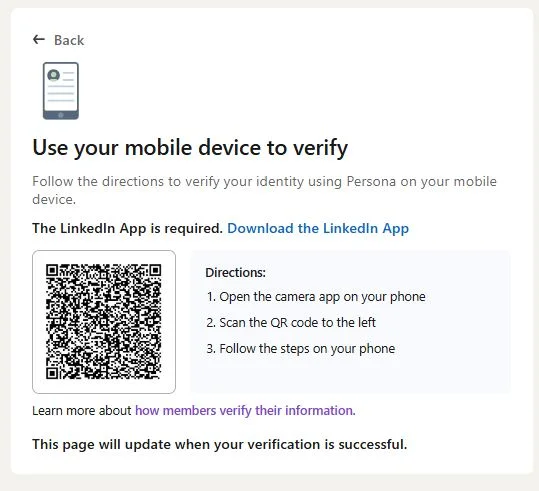
(Note: If you click on the “Add Verification Badge” button from your desktop, you will see that LinkedIn will ask you to scan a QR code using your phone’s QR code scanner or install a scanner like Google Lens to continue with the process!
However, you will not need to scan any QR code if you start the verification process using your phone.)
- After clicking on the “Add verification” button, select “Verify your identity” with Persona or CLEAR depending on your region.
Step 3. Getting Verified (Using Persona or CLEAR)
a. Verify Using Persona:
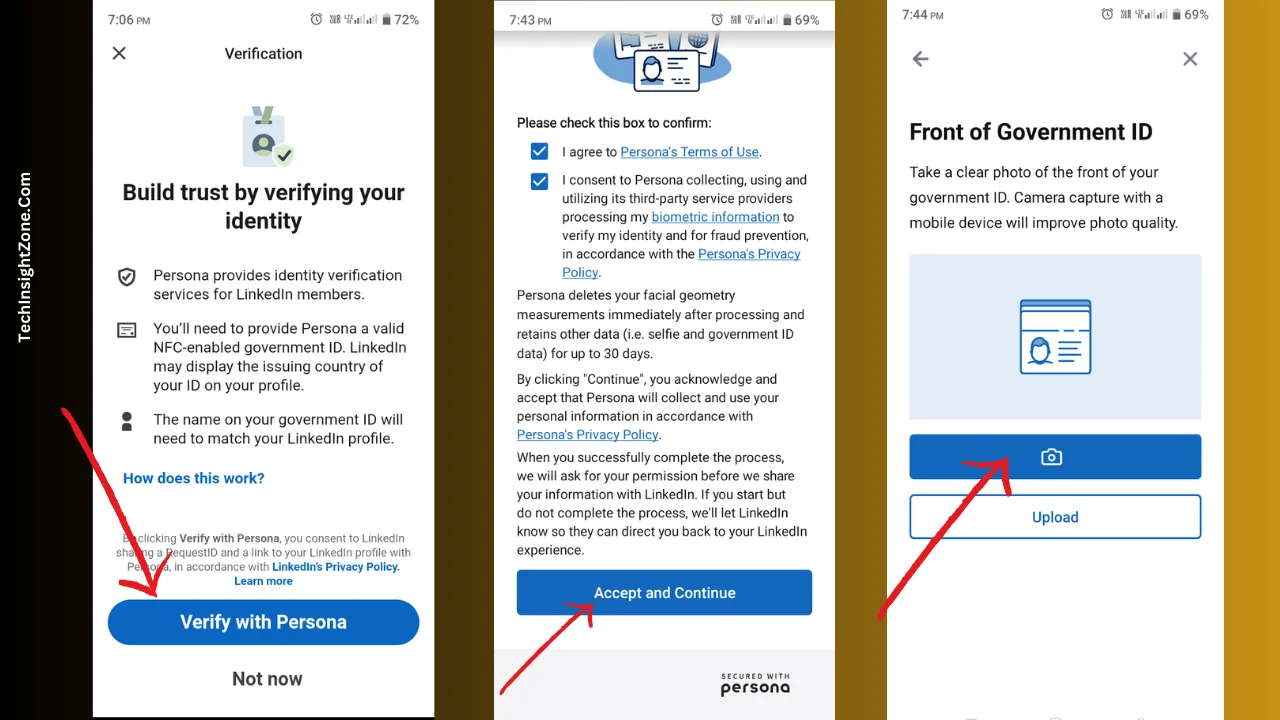
If you select “Verify with Persona” based on your location, you’ll be prompted to get started with Persona verification within the LinkedIn mobile app, where they will remind you that your Passport and LinkedIn name must be the same.
- Begin by selecting “Verify with Persona”.
- After that, agree to Persona’s terms and conditions, choose your country, and follow the on-screen instructions (Persona will guide you through the process).
- Now, take a picture of the front page of your Passport (ID details page).
- Once the picture is taken, click on use this photo and then Persona will show your details.
- Click on accept and continue.
- Finally, scan your passport’s NFC chip using your smartphone’s camera and take a selfie for facial recognition to complete the process.
You’ll know the verification is successful when you see a badge displayed next to your name on your LinkedIn profile.
b. Verify Using CLEAR:
- If you live in the USA, Canada, or Mexico and have selected “Verify with CLEAR”, will be prompted to get started with CLEAR verification.
- The process is quite similar to Persona, just follow the on-screen instructions, take a picture of the government ID, and submit your photo. You may also need to provide your phone number to receive a verification code.
- Also, agree with sharing your data with LinkedIn.
- If your LinkedIn name matches your ID and you did all the other steps correctly, your profile will be verified instantly and you will get the verified badge.
So, that’s how you can verify your LinkedIn account by verifying your identity.
Now, let’s talk about the two other options briefly as promised.
Verifying Your LinkedIn Profile (Alternative Methods)
If you don’t have an NFC-enabled passport or a supported ID for Identity Verification, you can still verify your LinkedIn profile using Workplace or Educational Institution Verification.
1. Workplace Verification: Confirming Your Employment
Workplace verification on LinkedIn is simply a way to prove that you actually work at the company you say you do. This helps build trust with others who view your profile, showing that you are indeed employed where you claim to be.
Here’s how to verify your workplace using the different methods:
A. Work Email Verification:
This is the most common method, but it’s only available if your company participates in LinkedIn’s program.
- Click on the “Add Verification Badge” Button: Go to your LinkedIn profile and select the Add Verification Badge button like before.
- Look for “Verify Workplace”: If your company participates, you’ll see a “Verify Workplace” option. Click it.
- Enter Work Emai: Enter your work email address.
- Verify the Code: LinkedIn will send a verification code to your work email. Enter the code on LinkedIn to confirm.
B. Microsoft Entra Verified ID Verification:
This method is available only if your company has enabled workplace verification through Microsoft Entra Verified ID.
- Start the Verification Process: Follow steps 1 and 2 from the Work Email Verification section above. If your company is set up for this, you should see an option related to Microsoft Entra.
- Follow the Prompts: LinkedIn will guide you through the process, which will likely involve logging in with your company credentials through Microsoft.
C. LinkedIn Learning/Recruiter License Verification:
This method is automatic if your company provides you with a qualifying LinkedIn Learning or Recruiter license and has enabled workplace verification.
- No Action Needed (Usually): If your company has properly set this up, the verification should appear automatically on your profile. You may need to ensure your LinkedIn Learning account is connected to your LinkedIn profile.
2. Educational Institution Verification: Confirming Your Education
Educational institution verification confirms your affiliation with a school or university. This is done using a LinkedIn Learning license provided by the institution.
Here’s how to verify your educational institution:
- No Action Needed (Usually): Similar to the Learning/Recruiter license workplace verification, if your institution provides you with a LinkedIn Learning license and participates in the verification program, the verification should appear automatically. Ensure your LinkedIn Learning account is connected to your LinkedIn profile.
Important Considerations:
- Company/Institution Participation is Key: These methods rely on your company or institution actively participating in LinkedIn’s verification programs. If they don’t, these options won’t be available to you.
- Check with Your Organization: If you’re unsure whether your company or institution participates, check with your HR department, IT department, or relevant administrative office.
6 Important Things to Know About LinkedIn Verification
- Optional but Recommended: Adding verifications is not required to have a LinkedIn profile, but it’s highly recommended to enhance your profile’s credibility and visibility.
- Free of Charge: There is no cost to verify your information on LinkedIn.
- Visible but Removable: Verifications are visible on your profile, but you can remove them at any time if you choose.
- Information Privacy: The specific information used for verification (like your email address or ID details) is not displayed on your profile. Only the verification badge is visible. LinkedIn may show which country issued your identification document.
- Verification Changes: Verifications may be updated or removed if your company changes its verification settings, if your license expires, or if you change your name (in which case you might need to re-verify).
- Use on Other Features: Your verifications may also appear in other areas of LinkedIn, such as on job postings you create, further enhancing your credibility.
Final Words
Verifying your LinkedIn profile, when possible, is a great way to boost your credibility and signal authenticity to your network. By confirming your identity, workplace, or education, you demonstrate that the information on your profile is accurate and trustworthy.
However, we understand that not everyone will be able to verify their profile using all methods. Perhaps you don’t have an NFC-enabled passport, your workplace doesn’t participate in LinkedIn’s verification program, or you don’t have a LinkedIn Learning license.
That’s perfectly okay. A verified badge isn’t the only way to build a strong presence on LinkedIn. Creating and sharing valuable content, engaging with your network, and optimizing your profile are all powerful ways to showcase your expertise and connect with others.
And if you’re actively managing your job search on LinkedIn, you might also be using the “Open to Work” feature. If you’ve recently found a new role or want to manage your visibility, you might want to turn it off.
We have a guide that shows you how to quickly and easily remove the “Open to Work” badge from your profile, check that and stay informed.


