
LinkedIn groups are a fantastic way to connect with professionals who share similar interests, industry knowledge, or career goals.
If you are looking to build a community, establish thought leadership, or drive industry discussion creating a LinkedIn group is a great start.
In this guide, we will walk you through the process of creating a LinkedIn group step by step.
How to Create a Thriving Group on LinkedIn
1. Navigate to “My Network”
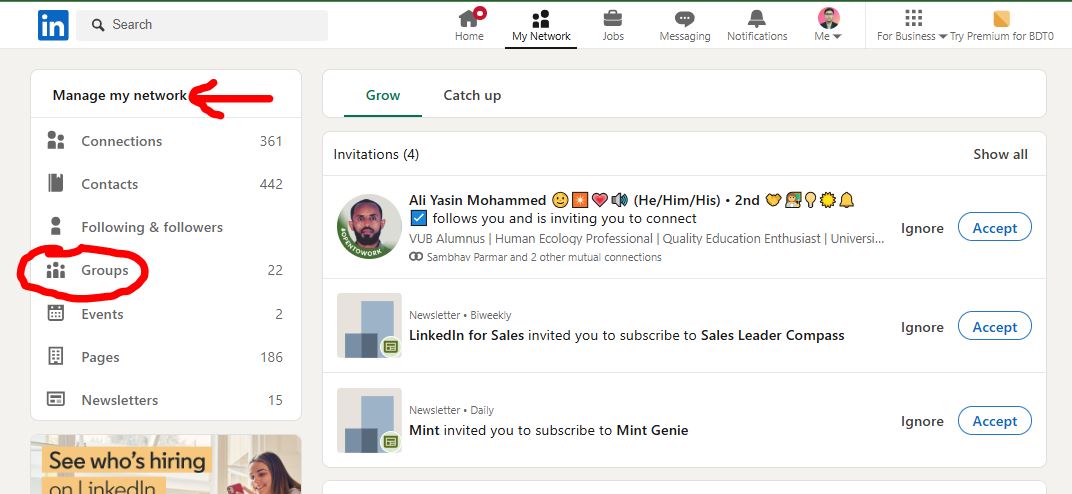
- Desktop: Begin by clicking on the “My Network” icon located at the top of your LinkedIn homepage.
- Mobile: Tap on the “My Network” icon at the bottom of the screen, then select “Manage my network“.
2. Access the “Groups” Section
- Desktop: On the left sidebar, you’ll find the “Groups” option. Click on it.
- Mobile: Within the “Manage my network” section, you’ll see “Groups”. Tap on it.
3. Initiate Group Creation
- Click the “Create Group” button. This will open the group creation interface.
4. Customize Your Group

| Customization Option | Details |
|---|---|
| Group Logo and Cover Image | Upload a visually appealing logo (300px *300px) and also a cover image (1174px * 444px) that represents your group’s purpose. |
| Group Name | Choose a clear, concise, and relevant name (max 100 characters). |
| Description | Write a compelling description (max 2000 characters) outlining the group’s purpose, goals, and target audience. |
| Industry | Select up to three relevant industries to help people find your group (e.g., “IT Services and IT Consulting”). |
| Location | Specify relevant locations for your group, if applicable. |
| Group Rules | Define clear guidelines for member behavior (max 4000 characters) to maintain a positive and productive environment. |
| Group Type: Choose between “Public” and “Private” | Public – Anyone can find, view, and access content. Private – Only members can see content; admin approval required for membership. |
| Discoverability | Public groups appear in search results and on members’ profiles. |
| Permissions: Configure the following permissions: | ✅ Allow members to invite their connections: Enable this to allow members to invite their 1st-degree connections. Remember, all join requests still require admin approval. ✅ Require new posts to be reviewed by admins: Activate this to review and approve member posts before they become visible. This helps maintain quality and prevent spam. |
5. Launch Your Group
- Once you’ve filled in all the necessary information and configured your settings, click the “Create” button. Your group will be live and ready for members to join.
While creating a group, ensure your LinkedIn account is verified to build trust and credibility. Here’s how to verify your LinkedIn account in 2026.
👋 Hi, Afuar here! I hope you’re finding our solutions helpful.
The same way I share fixes here, I also help brands with online marketing — from website creation and SEO to organic social media growth, and paid Meta/Google Ads.
If you need a trusted partner to handle your online marketing, or for any questions you can book a free call and we’ll discuss how to take your business to the next level.
Thanks for stopping by — enjoy your day!
– Md. Afuar Rahman
Tips to Launch and Run Your LinkedIn Group Successfully

1. Strategic Promotion:
- Instead of just “sharing,” actively target relevant individuals. Use LinkedIn’s search filters to find people in your industry or with relevant skills.
- Create a short, compelling video introducing your group and its value proposition. Share it on your profile and in relevant posts.
- Leverage LinkedIn’s “Invite Connections” feature, but personalize the invitations. Briefly explain why you think the group would benefit them.
- Cross-promote your LinkedIn group on other social media platforms where you have a presence.
2. Meaningful Engagement:
- Go beyond basic discussions. Ask open-ended questions that encourage thoughtful responses and debate.
- Share relevant industry news and ask for members’ perspectives.
- Host live Q&A sessions or webinars within the group to provide interactive value.
- Create polls to get quick feedback and gauge member interest in specific topics.
- Recognize and celebrate member’s achievements within the group.
3. Proactive Moderation:
- Establish clear, detailed group rules and guidelines, and make them easily accessible.
- Regularly monitor group activity and address any inappropriate content or behavior promptly.
- Use LinkedIn’s moderation tools to manage posts, comments, and member requests.
- Create a system for handling disputes or conflicts fairly and consistently.
- Actively remove spam and irrelevant posts.
- If necessary, you can block disruptive members to maintain a positive environment. Learn how to block and unblock someone on LinkedIn.
4. Value-Driven Content:
- Share exclusive content that’s not available elsewhere, such as industry reports, expert interviews, or behind-the-scenes insights.
- Create resources like checklists, templates, or guides that address members’ specific needs.
- Invite guest experts to share their knowledge and expertise with the group.
- Highlight member created content that is of high quality.
5. Consistent Activity:
- Develop a content calendar to ensure regular posting and engagement.
- Set aside dedicated time each day or week to manage your group.
- Track key metrics, such as member growth, engagement rates, and content performance, to identify areas for improvement.
- Even if activity is low, keep the group updated with valuable information.
Final Words
Creating a LinkedIn group can be a powerful way to build a professional community, share knowledge, and expand your network.
By following the steps outlined in this guide and actively managing your group, you can foster meaningful discussions and establish yourself as a thought leader in your industry.
Make sure you focus on consistent engagement, clear guidelines, and provide valuable content that keeps members interested and involved.
If you’re ready to take the next step, start your group today and create a space where professionals can collaborate and grow together.


